The Evasion HUD is ready and for sale in-world and at SLExchange. Click the vendor in-world for a notecard or visit the SLExchange item listing for details.
Also, join the group "Eyana's" for product announcements and freebies and stuff!
Thursday, August 23, 2007
Wednesday, August 22, 2007
Dashing and Double Taps
Projects have been coming along the past few weeks until yesterday when I started and finished the basic working bits of a new project. I made a dashing system. It is somewhat similar to dashing and dodging found on SL already in other combat systems, so it's not an original idea.
I started doing this to finally figure out how to detect double taps without needing to use complicated timers. Currently, I have the double tap detection function with a maximum of a half second delay between button pushes. Originally I had it at two-tenths of a second, but after handing a test version to someone it was apparent that would be a bit too fast for some people. I may, or may not add a customizable option for the delay speed so people can set their own preference.
The only thing it truly needs right now is a limit. Right now it can be used infinitely which—although it's really fun!—is not exactly fair and balanced for use in certain combat systems.
It works in mouselook mode and the default third person camera mode, but it is designed with the mouselook mode user in mind. Dashes are done on a horizontal plane while on the ground, but if the person using it is in the air then they can dash at any angle. This seems like it could be a lot of fun for sword- and gun-play.
Not only do I plan to include this with my swords (when I finally finish making animations—ugh!), but I am going to package it with any guns I make. There is a chance it will be added to the Ninja HUD, but I'm somewhat worried about including it in something that does not attach to a standard weapon spot such as the Right Hand attachment spot for most swords and guns. The reason behind this is that it could be misused as a sort of cheat while sparring with any combat system that has a similar dash or dodge capability. I tested with one of my C:SI swords and sometimes would get a C:SI dash and sometimes my own and sometimes both. It would be pretty obvious if someone was using this in combat: the sound is different and the movement speed is different, as well as the distance traveled (I think).
I have a few more ideas that I may try to get working if I can figure out the mathematics involved. Math is by no means my area of expertise. I'm more into classical rhetoric than crazy math. The ideas I have that I want to do are definitely beyond my current understanding and I don't know if there will be an easy way to cheat through it by guesswork. Then again, while I worked on the dash script I was nearly pulling my hair out from attempting something so overly-complicated and unnecessary when there was a much, much simpler way to approach the whole thing.
Actually, now that I've typed all that mess about not being able to figure out how to do what I want I think I have a half-baked idea on how to do it. I'll have to try later tonight.
On a side note, some of the gadgets from the Ninja HUD will be available for sale singly, possibly with more features and options. Namely, the Water Walking gadget and Smoke Bomb Escape will be made separately.
I think I will make a double tap detection template script for my LSLWiki page.
Friday, August 3, 2007
Lightning Effects Tutorial Part One: Painting the Particle
Recently I've been working on something that required some electricity/lightning type particle effects and I decided to make a tutorial on it. I thought it would be a quick and short tutorial, but it ended up being a lot of snapshots of the progress in Photoshop 7.0 for the step by step instructions.
I use Photoshop CS2 at home now, but since I'm working and all I have available is 7.0 this tutorial is related to 7.0, but it should work in most versions of Photoshop as well as similar image editing software (the menus and layout might appear different).
Anyway, on to the tutorial.
This lightning effect is intended to be used in a particle script (tutorial part two will be written whenever I get home, have time, and have access to Second Life and my scripts).
The format of this tutorial will be like this: picture first and then text describing the above picture. Click any of the pictures for a full size version if it's difficult to read in the small version.
Create a new image:
Select the Gradient Tool:
Paint the Gradient:
Result of the Gradient:
The Levels adjustment window:
Select the new layer:
Part Two Coming Soon:
I use Photoshop CS2 at home now, but since I'm working and all I have available is 7.0 this tutorial is related to 7.0, but it should work in most versions of Photoshop as well as similar image editing software (the menus and layout might appear different).
Anyway, on to the tutorial.
This lightning effect is intended to be used in a particle script (tutorial part two will be written whenever I get home, have time, and have access to Second Life and my scripts).
The format of this tutorial will be like this: picture first and then text describing the above picture. Click any of the pictures for a full size version if it's difficult to read in the small version.
Create a new image:
- 512 by 512 pixels
- transparent background
- Note that the final image might need to be resized to a lower resolution depending on the intended size of the particle effect and the consequences of lag from needlessly large textures.
----------
- The gradient tool is on the same button as the Paint Bucket. If only the paint bucket is visible just left click and hold the mouse button down until a little side menu opens up (as in the screenshot).
- The foreground and background paint colors should be white and black respectively.
- An easy way to do this is push the D key on the keyboard to set the colors to default (black foreground and white background) and then push the X key on the keyboard to swap foreground and background colors.
- The type of gradient we want is the very basic style (left icon at the top of the screen just underneath the Filter menu).
----------
Paint the Gradient:
- At the top left of the image, click and drag to the bottom right of the image.
- To keep this at a perfect angle hold down Shift while dragging.
Result of the Gradient:
- The image should now look similar to the one above.
----------
Apply a Difference Clouds Filter:- Find the Difference Clouds Filter in the Render menu (pictured above for Photoshop 7.0) and apply it.
----------
Difference Clouds Result:- Above is the result of applying the Difference Clouds filter.
- Results will vary! If you do not like your initial result then undo (Ctrl Z) and reapply the Difference Clouds filter.
----------
Invert the image:- Find the Invert option in the menu (as shown above) or simply press Ctrl I on the keyboard.
----------
Result of inverting the image: - Above is the result of inverting the image.
- Look carefully at the brightest spots on the image and it might be starting to look a little bit like lightning!
----------
Bringing out the Lightning Effect:- Okay, so there is a bit of a lightning zap in there, but it's surrounded by a bunch of stuff that is not needed. Thankfully, there is a way to make it easier to work with.
- Go to Image, then Adjustments, and then Levels (or push Ctrl L).
----------
The Levels adjustment window:
- This is what the adjustment window will look like before touching anything.
- What will be adjust are the three triangles just below the graph.
----------
Middle triangle first:- Drag the triangle that is in the middle of the line all the way to the right.
- The changes will appear on the image as they are done if the Preview box is checked.
- It's always good to pay attention to the effect of adjustments before applying them.
----------
The leftmost triangle:- Now slowly drag the leftmost triangle (the fully black one) and the image's background should get darker and darker and the lightning effect more prominent.
- Leave the triangle in a spot where it looks like a decent lightning effect.
- For reference, the black triangle corresponds to the number 162 in the input levels boxes.
----------
Result of adjusting Levels:- The above image is the result of levels adjustments.
- There are still bits and pieces of the image that will not do for a lightning effect, so the next few steps will deal with eliminating the unnecessary bits.
----------
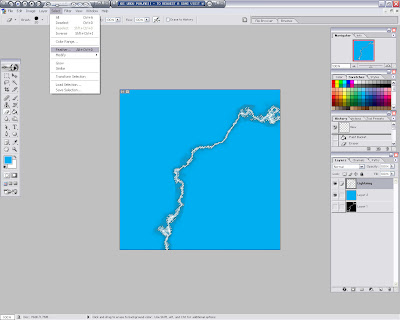
Selecting the Lightning:- Firstly, the lightning needs to be separated from the black background and put onto a new layer.
- Make certain the layer is selected and use the keyboard shortcut Ctrl Alt Shift ` (` is the key to the left of the one key on US keyboards).
- This keyboard shortcut automatically generates a selection mask based on the lightest parts of the image—perfect for quickly grabbing the lightning.
- Alternatively, using the Select menu and choosing Color Range for either white or black (invert the selection afterwards if selecting from black) with a tolerance of about 20 or so might get a similar selection.
----------
Create a New Layer via Copy:- Open the Layer menu, expand the New sub-menu, and choose "New Layer via Copy" at the bottom.
- This will create a new layer based on what is in the selection mask. If the mask was created using the keyboard shortcut described in the previous steps then a good portion of the faded parts of the image will be copied as well with some transparency to it.
- Alternatively, push Ctrl J to create a new layer via copy.
----------
New layer result:- This is the resulting layer from the copy.
- The original layer is hidden to show the transparent background.
- Click the little eye next to a layer to hide it. Hidden layers will stay hidden when you save the final image.
- The selection mask is automatically removed after making a copy via selection.
----------
Renamed the main lightning layer:- At this point I decided it was time to rename the lightning layer so I could keep track of it later on as I add and remove more layers.
- Right click on the layer in the layers list and pick Properties and then rename it to something you can remember.
----------
Creating a temporary solid layer:- Next I created a new layer.
----------
Rearrange the layer order:- The purpose of the new layer is to be a solid color behind the lightning effect to make things easier on the eyes while editing so the new layer needs to be dragged beneath the Lightning layer.
----------
Paint Bucket to fill the new layer:- Use the paint bucket and fill the newly created layer with black paint.
- This looks similar to what we had a few steps ago after adjusting the Levels, but the difference is that now the lightning is separated from the black background.
- Doing this allows us to see what parts need to be erased or edited.
----------
Time to start Erasing!- Select the eraser tool as shown here.
----------
Erase away:- As you can see in the above image compared to previous images there has been a bit of extra white paint erased away.
- At this stage I was mainly removing the bits that were not connected to the main lightning effect. Do this to your own satisfaction and don't worry if erasing leaves some of the faded white looking bad with an edge to it. Later steps will help to fix that sort of thing.
----------
Messiness test:- Here I've filled the middle layer with blue paint to see the tiny bits of transparent paint on the main lightning layer that need to be removed. The parts on the image that look darker than the rest of the blue and are not close to the lightning effect need to be removed.
- More erasing!
- In retrospect, I should have made the layer blue to begin with instead of black.
----------
Resulting image thus far:- This is what it looks like after erasing the extra bits.
----------
It still needs cleaning:- As you can tell, this still needs a bit of work before it will work well as a transparent texture.
- Ctrl Click on the name of the lightning layer in the Layer window on the right to create a selection mask for all paint on that particular layer.
----------
Feather the selection:- Open the Select menu and choose the Feather option.
- Ctrl Alt D is the keyboard shortcut.
----------
Feather away:- I picked a 2 pixel radius to feather the selection.
----------
Invert the Selection Mask:- Go to the Select menu and pick Inverse or use the keyboard shortcut Ctrl Shift I.
- The result is that everything except for the lightning effect will be selected.
----------
Pull out the eraser again:- Using a large size eraser (to speed up the process), erase all over the image, especially around the lightning effect.
- From the feathered selection, the transparent bits that have hard edges or lines should now blend away a bit better.
----------
Increasing the Lightning Effect:- Duplicate the Lightning layer.
----------
- Select the new layer by holding Ctrl and left clicking on the layer in the layer list.
----------
Feathering time again:- Feather the selection on the new layer just the same way it was done on the previous layer.
----------
Invert the Selection:- Invert the selection (Select menu, Invert, or Ctrl Shift I)
----------
Erase around on the new layer:- Just as before, erase around the image.
- The reason for doing this process again on a second layer is to increase the effect of the light fading away and to hopefully make things look smoother.
----------
Link the two layers:- With the main lightning layer selected, click the little square to the left of the lightning copy layer. They are linked when there is a little paper clip in that box.
----------
Merge the lightning layers:- In the Layer menu, choose the Merge Linked Layers option or simply push Ctrl E on the keyboard.
- The layers have now been smooshed into a single layer.
----------
Progress check:- I find it much easier to see how things are going by viewing the effect on a black background, so I have change the blue layer back to black.
----------
Adjusting the position of the layer:- Choose the Move tool (the V key on the keyboard) and move the Lightning layer until it does not collide with any of the image's edges.
- If having difficulties with this then resize the layer by doing a Free Transform (push Ctrl T).
- To resize while Free Transforming, move your cursor to the top left of the rectangular shape that appears around the layer until you see the cursor turn into two opposing diagonal arrows. Hold down shift, click and drag to scale the layer without changing it's aspect ratio.
----------
Result of Layer movement:- Above is what mine looked like after nudging it around a little.
----------
Adding some glow effects:- There are probably multiple ways to add a bit of a glow to the lightning effect. I like to make the glow effect on a new layer so my current effect isn't changed in case I need it again.
- Start by duplicating the Lightning layer.
----------
Applying a Blur filter:- A blur will do nicely to make a glow effect for my lightning.
- Under the Filter menu and in the Blur sub-menu, choose Guassian Blur.
----------
Decide on a blur radius:- Choose a blur radius that works well for the lightning bolt. For this one in particular, a 15 pixel radius seemed to do nicely.
----------
Result after Guassian Blur:- Above is the resulting image after applying the Guassian Blur Filter.
----------
Hard Lines:- As you can see, where the Lightning originally rested against the edge of the picture there is a hard line, so it's time to eliminate that.
----------
Select the Blur tool:- Push B or select the Blur tool from the toolbar.
----------
Blur it!- On any of the hard edges, just hold the blur tool there until it fades and blends in with the rest of the image.
- It's recommended to use a small blur brush for this, for you don't want to blur more of the lightning effect than is necessary.
----------
Final result!- Here is the final result! It's hard to see with all the layers turned off. In Photoshop 7.0 if I save as a TGA file I can upload the image to Second Life without any transparency problems.
- If using PSCS2 then saving the image as a PNG file will automatically save properly for use in Second Life with transparencies.
- Download and extract this file to get the final particle texture from this tutorial.
Part Two Coming Soon:
- I'll make the next part of this tutorial soon. It will show how to use the particle effect painted in Second Life by using a standard particle script template.
Subscribe to:
Posts (Atom)